Tuesday, December 8, 2009

Reindeer Noses (repost) ~ 12.8.09


These are one of the biggest "hits" on my other blog- so I thought I'd post them here as they're also a very easy peasy holiday treat to make, especially with kids!

I was inspired by a recipe on Family Fun dot com and by a recipe my mom makes that is similiar except that she uses a pecan on top.


Instead of calling these holiday pretzel treats, I thought Reindeer noses was much more... well, creative, and fun!

REINDEER NOSES


Ingredients:
  • little pretzels- this year I'll be using up all those little bags of pretzels we got at Halloween!
  • Rolos
  • M&M's- preferrably red and brown - Red for Rudolph and brown for all the other Reindeer

Here's what the kids can do after they've washed their hands:


1. line up all the pretzels on a parchment or silpat lined baking sheet


2. Unwrap your candies- eat a couple


3. Place Rolos on top of the pretzels


4. Have Mom or Dad place the Rolo topped pretzels in a preheated 200 degree oven for about 5-7 minutes. You want the Rolos to be soft and malleable, but not melted into a pile of goo.


5. Remove the cookie sheet and somewhat quickly and carefully (pan will be warm, it was in the oven) smoosh (very technical word here) the M&M's on top of the Rolos.


6. Place finished Reindeer noses onto a plate and pop them into the fridge to set. Then you can place them in a airtight container for as long as you can keep little hands from eating them! They freeze well.

For more Tempt my Tummy Tuesday recipes, head on over HERE!


Saturday, November 28, 2009

Fresh Cranberry Salsa ~ 11.28.09

Not too long ago, a friend of mine made this little number and the rest is history.

I have a funny relationship with cranberries. I love the sweetened Ocean Spray variety. I will drink a blend of cranberry and whatever fruit they pair with it in a juice. I make Cranberry Jello Salad every holiday and thensome. Yet, I do not buy or bake with fresh cranberries all that often.

This Thanksgiving though, that all changed. I started buying them and throwing the bags in the freezer b/c I knew that I could certainly bake with them throughout the year and that this was the best time to buy them at $2 a bag. I have a ton of recipes that call for cranberries and I would like to give a fresh cranberry sauce a go at some point, just so I can see if I like it or not. The color of the cranberries is enough to make me want to eat them!

Enter onto the scene this beaut of a recipe. Fresh Cranberry Salsa. It sounded like a winner when she told me about it and I demanded, politely, that she make it for our next MOPS meeting. And it was a winner. And....

I

COULD

NOT


STOP

EATING

IT!

Something about the sweet and the tart and the kick of the jalapenos just beckoned me to keep eating!

Without further ado.... I give you Sharon's Fresh Cranberry Salsa:

1 bag fresh cranberries (haven't given this a go with frozen yet... but I will)
2-3 chopped green onions
1 jalapeno pepper, ribs and seeds removed, then chopped (I used half, but may add the whole thing next time)
1/4 cup sugar
2 tsp chopped cilantro
1 tsp grated fresh ginger
1 tsp lemon juice or lime juice

Oh and I also threw in a sprinkling of kosher salt to bring out the flavors of everything

Chop the cranberries in a food processor.
Add all the other ingredients and let them marry together in the fridge for awhile- at least 2 hours. Serve with your favorite tortilla chips.


these are my faves, with salt:

Wednesday, November 25, 2009

It's the most delish feast of the year! ~ 11.25.09

Oh boy, am I excited for tomorrow. Currently I'm praying earnestly for a miraculous opening of my nasal passages so that I may SMELL Thanksgiving just as much as taste it!

I had to post these so as not to forget them for the future. What a fun and simple idea. I know I'll have some leftover pie dough scraps tonight and can make these leafy treats via Family Fun!


I imagine mine will be filled with cinnamon chips or Nutella- Yum yum!

My mom will be cooking all the main dishes (turkey, mashed taters, stuffing) and her apple pie. My   Thanksgiving Day responsibilites are:
  • Pumpkin Pie
  • Pumpkin Ice Cream pie with Gingersnap crust - made and in the freezer already!
  • Biscotti - done
  • Old-fashioned Pumpkin cookies - done!
  • Cranberry Salsa - awaiting the recipe from a friend, but this is DE-LISH-US
  • Roasted Carrots and Parsnips (if there are leftovers they'll be turned into Roasted Carrot and PUmpkin soup- it is soooooo good)
  • Cranberry Jello Salad
WoW, when I write it all out- it sure does sound like a lot. But really, half is already made. The veggies are a no-brainer, the cranberry salsa and jello salad and pumpkin pie will be made tonight and I'll be done.

What are you making for Thanksgiving?

I'll also be printing out these for the kids to do when they get a little out of control....
Thanksgiving printables

Monday, November 9, 2009

Honey Lime Chicken Enchiladas ~ 11.9.09


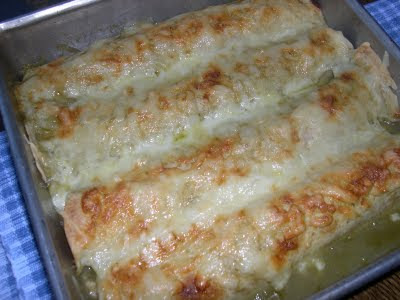
(Enchiladas just do not photograph well... I tried this in a few different places and this will have to suffice.)

This recipe was posted over at The Sister's Cafe and I've made it twice now. The kids wouldn't touch it the first time and the second time... they gobbled it UP! Love the sweet and spicy combination of these and that they do not contain any condensed soups. So many enchilada recipes are just heavy and laden with those soups (sorry if you like that type). These are more my style. I added cilantro to my chicken mixture  because it just works well with all the flavors and because I had some in the fridge that I needed to use up.

Honey Lime Enchiladas
via The Sisters Cafe with my creative license added

about 2 cups of cooked chicken - pulled/shredded (or pork)

Marinade:
Mix together:
1/3 cup honey
1/4 cup lime juice
1 Tbs chili powder ( may need to use less for my weaklings next time)
1 tsp garlic powder

2 cans green enchilada sauce or 1 can and some green salsa (it worked and I had some salsa to use up)
1/2 cup heavy cream 

shredded monterey jack- some for inside and lots of ON TOP!
(the Sisters use a combo of mozzarella and cheddar)

flour tortillas - I like the wheat ones

Directions:
Mix together your sauce ingredients and add them to the chicken (or pork). Let marinate for about 30 minutes. I've let mine sit overnight.

Lightly spray a 9x13 pan with cooking spray. Pour in some enchilada sauce- just enough to coat the bottom of the pan.
Fill the tortillas with an ice cream scoop of filling and cheese (oh, I mixed in the cheese with my marinated chicken mixture right before I filled the tortillas). Roll them up and line them up in your pan. I had to squeeze one along the side, but I believe I wedged 10-12 of them in there. You can always carry over to another pan if you need to do so.

Mix remainder of the green enchilada sauce with 1/2 cup whipping cream. Pour over the enchiladas and top, generously, with more cheese! I also sprinkled some chopped cilantro on top.
Bake uncovered at 350 for 30 minutes. Turn on the broiler and let the cheese get all brown and crispy on top- just a few minutes should do the trick!

Serve with a side of Lime Cilantro Rice with pineapple!

another not so photogenic shot of these delicious little treats!

Sunday, October 25, 2009

Frightening Food! ~ 10.25.09

It's really hard for me to fathom that October is nearly over- which means Halloween is nearly here! EEKS!

I think we have all our costumes.... but Commander Fox and Chewbacca may need a little tweaking. In fact we will, as I'm typing this I'm awaiting the lady on craigslist to tell me if a Darth Vader costume is available. The seven year old has changed his mind... again. lovely.

But these precious little mummy dogs make me smile. Here's how you can make them- visit here!


Last year, we made mummy pizzas. English Muffins with sauce and mozzarella cheese. My kids do not like olives, but my husband does, so it was okay to open a jar just for decorational purposes. I've been using this simple pizza sauce recipe lately and really love it! So EASY to make!


When you serve your kids food like this... they may just make super scary faces at you while you take their picture.... oooooo..... very scary!


So this is usually what they eat for Halloween... simple food that is fast and KID-Friendly.

To find out what I will be eating for All Hallow's Eve... you'll need to check back later this week!

Thursday, October 15, 2009

Kitchen Tip: Chopping Herbs ~ 10.15.09

Learned this at a pampered chef party way back when and thought it was brilliant!

Put your herbs in a cup.

Insert kitchen shears (an indispensible kitchen tool I might add) and start snipping, snipping, snipping...


Voila! Dump into the dish you are preparing!


Need a tip? Have a tip? Let me know in the comments!

Monday, October 12, 2009

Review: Walking Tacos ~ 10.12.09

Today's meal is brought to you by Corona and Doritos.

Kidding. But they go great together and are somehow involved in this meal I'm about to share.
I was reminded it of it last weekend while I was at Applefest up in Franklin, Pa. Tons and tons of food vendors and I saw a sign for walking tacos! You're going to love this recipe. I discovered it over at Mennonite Girls can Cook and/or Bless Us O Lord- maybe both.


A walking taco (they're a.k.a. campfire tacos) is: all your essential taco ingredients contained in a very convenient little bag of doritos! Brilliant!

I love them that way b/c :
a) my kids can eat them without tears (they get SOOOO very frustrated when their taco shell breaks and all the stuff pours out of them) and
b) they're so darn fun!

You can make whatever taco meat recipe your little heart pleases, I prefer the America's Test Kitchen one which I'll post down below. You get all your taco ingredients together in little bowls and you buy a bunch of little bags of doritos (Target has them and Walmart, too)- you can buy JUST snack size doritos, as I discovered when I went to make these the first time around.

Here we have taco meat, shredded lettuce, taco sauce, tomatoes, avocados, monterey jack cheese and queso.

Open up your dorito bag and fold the top over just a little. Scoop in your taco fillings, mix it up and bit and eat it with a fork or spoon. Grown ups, add corona with lime. YUM!

If you have leftovers, you can scoop all the ingredients onto broken up pieces of taco shells or tortilla chips.... fun and yummy snack! Little open-faced tacos. Taco bruschetta. Whatever, it's good.

My favorite taco meat recipe:
Beef Tacos - serves 4; (can double, but you'll want to cook the meat in batches)
2 tsp veg oil
1 small onion, chopped small
3 medium garlic cloves, minced or pressed
2 Tbs chili powder
1 tsp gr cumin
1 tsp gr coriander (I don't have this)
1/2 tsp dried oregano
1/4 tsp cayenne pepper
salt
1 pound 90% lean ground beef
1/2 cup tomato sauce
1/2 cup low-sodium chicken broth
1 tsp brown sugar
2 tsps vinegar, preferrably cider vinegar
black pepper
  • Heat oil to medium and saute onion until softened, about 4 minutes.
  • Add the garlic and spices and 1/2 tsp salt; cook, stirring constantly, until fragrant, about 1 minute
  • Add ground beef and cook, breaking up with spoon and scraping the bottom of the pan to prevent scorching, until the beef is no longer pink, about 5 minutes.
  • Add the tomato sauce, broth, brown sugar and vinegar; bring to a simmer.
  • Reduce heat to med-low and simmer uncovered, stirring frequently and breaking the meat up so that no chunks remain, until the liquid has reduced and thickened (the mixture should not be completely dry), about 1o minutes.
  • Adjust the seasonings with salt and pepper to taste.


Wednesday, October 7, 2009

Best Ever Hot Cocoa Mix ~ 10.7.09


Gray, ominous, chilly days like this call for a hot steamy cup of the most delicious hot cocoa.
We tried this recipe last year (or the year before) and it is now a family staple! It is creamy, thick and best with your favorite topping: whipped cream or marshmallows. In the pic above we added some Ghostmallows, could you tell.

3 cups nonfat dry milk
2 cups confectioner's sugar
1 1/2 cups Dutch-processed cocoa powder (I uesd Hershey's as Dutch processed is hard to find)
1 1/2 cups white chocolate chips
1/4 tsp salt
1 1/2 Tbs cinnamon (optional)

Combine ingredients in a large bowl. Working in batches, pulse ingredients in food processor until chocolate is finely ground.
To make hot cocoa, stir 1/3 cup (I think a 1/4 is fine) of mix into 1 cup hot milk. Top with marshmallows and cozy up with someone you love.

Makes 20 servings

Can be stored in an airtight container for up to 3 months (or in my case, a lot longer- just found some in my pantry and drank it tonight. it was from our last batch... last fall)

(inspired by America's Test Kitchen)

Thursday, October 1, 2009

Cranberry Jello Salad- a family fave


My Godmother, Deanna, made this recipe for years and its been a longstanding family tradition to have it at the Thanksgiving and Christmas tables. My kids love it and I've taken to making it throughout the year for picnics or as a fun side dish alongside pork or chicken. In fact, I'm so fond of making it that I always have the ingredients for this on hand for when I need a quick side dish- I keep them all together on the pantry shelf so that I know if I'm missing one of them or need to restock on whole cranberry sauce! Good tip.


I often leave out the walnuts when I bring it to a large group event as I'm fearful of nut allergies- so know that it tastes just as good without them as it does with them included.


Cranberry Jello Salad

1 large cherry jello (big package- or two small)
1 can Ocean Spray whole cranberry sauce
1 can crushed pineapple, drained, but not all the way
1 can mandarin oranges, drained
1/2- 1 cup walnut pieces

Boil 1/2 cup of water; Dissolve jello with water in large bowl.

Add the rest of the ingredients and mix well.

Let sit overnight in fridge.


As I was typing this up, I noticed I taped an alternate version of this recipe to the back of my recipe card. I'm thinking I cut it out of a magazine or the coupon section of the paper. I'll post that here as it does sound interesting and the kids might really enjoy it! Let me know if you try it.

Monday, September 28, 2009

Farmer's Market Chili ~ 9.28.09

One of my favorite places to hunt down recipes has always been the newspaper. Funny though because I don't even subscribe! Yet, I know every Thursday, the food section will be in the Post Gazette and if I don't clip it from my parent's stash of papers (which they drop off to me so that I can recycle them at our school) then I can simply go online to find some inspiration.


This recipe appeared a several weeks back when zucchini were abundant and taking over everyone's garden. Unfortunately, by the time I got around to trying this recipe... zucchinis were non-existent at our farmer's market. Not even ONE zucchini was left to sell! I had to trek to the grocery store to buy mine, but it was well worth the price.

I've adapted this recipe that was submitted by Lori of McMurray, Pa and renamed it to make it more appealing to my very discriminating in-house critics (aka my children).

One of the ingredients to this Farmer's Market Chili -that I've only recently starting using in the past year or so -is this Adobo seasoning with pepper (I buy the red capped bottle).

It has appeared in at least a handful of my favorite recipes and I added it to this one as well. You'll be surprised how much you use it once you've tasted it! I promise to post my favorite Mushroom and Artichoke Pasta that incorporates this seasoning very soon- I've been craving it anyway.

You'll notice my chili sits atop a fluffy cloud of homemade mashed potatoes. I never ate chili any other way growing up and thought everyone else did the same, until I got married! The night I made this I offered the kids a choice of baked potatoes or mashed potatoes. They all chose baked! The best part was that 3 out of 4 of them gobbled this up and declared it "DELICIOUS!" I'll add this to the running list of "ways I got my kids to eat vegetables".

Farmer's Market Chili
2 Tbs canola/vegetable oil
2-3 onions, small, chopped
1 1/2 tsp garlic powder
1 tsp Adobo seasoning with peppers, optional
1-2 Tbs chili powder- I used 1, but may go 1 1/2 next time
1/4 tsp dried basil- I opted for the frozen cubes of basil from Trader Joe's in my freezer
1/2 tsp cumin
2 cups zucchini, diced- I used a combo of summer squash and zucchini
3-4 carrots, peeled and diced
2 14.5 oz cans diced tomatoes- I used crushed b/c that's what I had
1 15 oz can white beans- cannelini, drained and rinsed
1 15 oz can red kidney beans, drained and rinsed
1 can water
In a large pot, heat oil over medium heat and saute onion until soft and tender. Add carrots and saute until softened (I did not do this the first go of the recipe and it took the carrots FOREVER to tenderize- so I'll try this the next time). Add remaining ingredients. Bring to a boil; reduce heat and let simmer 35 minutes. (I let my simmer much longer, as a good chili should) Taste and adjust the seasonings- I added more Adobo to mine.
If the chili is too thick for your preference, you can add a can of tomato sauce and a small amount of water towards the end of the cook time.
The original recipe says this yields 6 servings. I filled three yogurt quart containers!
Serve a la your favorite way to eat chili... mine is pictured up at the top!

Monday, September 21, 2009

Chicken Crescents and bonus dessert! ~9.23.09

I might be exaggerating to say that my life changed quite a bit when I discovered this recipe, but not by much. The entire Costain crew loves these Chicken Crescents and that makes for a very happy momma. They don't even pick out the "red things" anymore! I know that crescent rolls might not be the healthiest of foods, but they are, in fact, the coolest food invention in my book and I depend on them for quick meals/appetizers/desserts often.

The original recipe can be found in the Three Rivers Cookbook III (known in our family as the "blue one") on pg 111.

Ingredients:

  • 1 can crescent rolls
  • 3 oz cream cheese, softened
  • 2 Tbsp butter, melted
  • 2 cups chicken, cooked and cubed/shredded (whatever you want)
  • 1 Tbsp chopped pimento- I do not stress if I don't have this in the house, optional
  • 1/2 red pepper, diced and sauteed
  • 1/2 pound mushrooms, diced and sauteed
  • 3-4 green onions, chopped and sauteed
  • S & P
  • 2 Tbsp milk
  • 1/2 Tbsp chopped parsley

After I preheat the oven to 350 degrees, I start by putting the cream cheese and butter in a bowl and popping them in the microwave a few secs to soften. I mush them together with a fork with the chopped parsley.

Then I saute up the peppers, green onions and mushrooms. I season them with Salt and Pepper, to taste, at this junction, too. The amounts for this vary in my house depending on what I have. The original recipe calls for green pepper (only 1 Tbsp sauteed) and only 2 Tbsp chopped sauteed mushrooms. I use A LOT more than that, prefer red peppers and these are still stellar and filling! Don't they look delish all sauteed up...


And the star of this dinner... most versatile food invention evah... CRESCENT ROLLS! AND I'm not brand specific either. I prefer pillsbury, but I've bought store brand, "wally world" brand and others. Whatever floats your pocketbook's boat, in my opinion. If you are using these, don't forget to snip off the box tops and send them to a school you love!
You'll need to keep these in rectangles. So open the package and put them on a greased or silpat lined baking sheet. Smoosh the perforated edges together to form 4 rectangles.
Now, let's get the filling ready to go...

So, after you sautee the veggies, let them cool for a few in the pan or in a bowl. Then if you need to cut up your chicken, do that now. I almost always use leftover rotisserie chicken for this. However I have poached chicken to use specifically for this recipe and if I do this, I do double and freeze the other half for a day when I need cooked chicken in a recipe. (do you know how to poach chicken? I'll teach you if you'd like... Sarah Moulton taught me, she used to be on Food Network, I've learned a lot from that channel).

Okay, chicken's ready, put it in the bowl with the cream cheese, butter and parsley.
Add your sauteed veggies and the 2 Tbsp of milk. The milk helps it all to go together nice and smooth. It should be creamy looking- you're ready to fill those crescents.
Spoon about a 1/2 cup of the mixture on each crescent (if you have more, save it or open up another can of crescents- I can tell you what to do with "leftover crescents" later).
If only I took pics of this next part- you bring the four corners of the crescent roll together in the middle and twist... can you envision that? I hope so. It will look like a little purse, of sorts.

Bake at 350 for 20-30 minutes. You'll want them to look like this... all golden and delicious!

BONUS DESSERT:
If for some reason you have leftover crescent rolls b/c you have more than enough filling... consider yourself lucky!


Grab some chocolate chips or cinnamon chips or butterscotch chips or nutella-- something sweet that melts. And put a little bit in the large end of a crescent triangle. You want to roll it up in a crescent roll shape and make sure that the chips are hidden inside... they may oooze out while baking. Bake for about 9-13 minutes and you'll have chocolate crescents (or whatever flavor you put inside there). Nutella rocks, by the way.

Serve with rice and a salad! Buon Apetito!


Monday, September 14, 2009

Wild Rice Salad with Cranberries ~ 9.14.09


Wild Rice Salad with Cranberries
from The Three Rivers Renaissance Cookbook IV, Rania Harris
serves 8-10

I've made a few changes to this recipe over the past several times I've made it as I often have a bit of a hard time finding wild rice that doesn't come in a box with a flavoring packet. Trader Joe's to the rescue. I've used their version of wild rice and also added a brown mixed rice to it as well. No other changes were made to the recipe except that I used 2 cups of uncooked rice (cooked separately as their cook times were different). If you're doubling this, know that you can double the rice (as I stated above) and the other ingredients and you will still have plenty of dressing. Lastly, I only used olive oil, but you can certainly stick to the recipe and use 1/2 oo and 1/2 canola.

Cooked wild rice- begin with 1 cup and follow package instructions for cooking
1/2 cup diced celery
1/2 cup diced red pepper
1/2 cup diced yellow pepper
1/2 cup toasted chopped pecans (toast first, then chop)
3/4 cup dried cranberries (I've also used this lovely little mix from Trader Joe's of cranberries, cherries and pomegranate seeds, mmmm)

Dressing:
6 Tbsp balsamic vinegar
1/2 tsp salt
2 Tbsp brown sugar
1 tsp dijon mustard
1/2 cup vegetable or canola oil
1/2 cup olive oil
salt and pepper


Cook rice and drain any excess water and cool.

Combine rice with celery, peppers, pecans and cranberries.

Combine dressing ingredients in a lidded jar and shake shake shake!

Dress the salad with enough dressing to coat and flavor well. Refrigerate and taste before serving. (I often add the rest of the dressing after letting the salad sit in the fridge overnight- add salt and pepper to taste, too)

Thursday, September 10, 2009

Back to School ~9.10.09

Made these from family fun Sept. 08. so cute and delicious, of course.

We are back to school over here and that means I need to get back to posting...

I'll be bringing you a week of recipes beginning next week and I promise to get those Taquitos, spinach balls, wild rice salad and a few more newbies up for you to see and try soon! You will not be disappointed!
Stay tuned....

Friday, July 31, 2009

What's on the menu? ~7.29.09

Okay, so cucumber salad is not so thrilling for anyone, huh?

Well, here's what's on tap at Crafty's Cafe... she's busy in the kitchen this minute making

Wild Rice Salad
Cucumber Salad
(but you're not excited about that one)
Creamy Chicken Taquitos
Drunken Watermelon
Buckeye Bars
Spinach Balls

hungry?

What recipe do you want first? Leave me a comment!

Saturday, July 11, 2009

Cool, crisp Cucumber salad ~ 7.11.09


My entire family of 6 loves this salad (THANK YOU, GOD) and I can't say that about many recipes or foods!
So I make it all summer and whenever I find some nice looking cucumbers. These were English Cucumbers [English cucumbers can grow as long as 2 feet (0.61 m). They are nearly seedless, have a delicate skin which is pleasant to eat, and are sometimes marketed as “Burpless”, because the seeds and skin of other varieties of cucumbers can give some people gas - via wikipedia]- which explains why they're roundish and still have the skin on them. If they weren't I'd have had to peel, cut the cuc in half and scrape out the seeds with a spoon.

Now you're ready for this super-duper easy and delish recipe:

1-2 English cucumbers- if not English ones, do what I described above
1 Tbs kosher salt
1 tsp sugar
4-5 Tbs white wine vinegar
fresh or dry dillweed (if using dry, I just shake it on until the cucs are evenly coated)

Slice your cucumbers very thin. Toss with salt and sugar and dillweed. Add vinegar. Put in fridge and let the flavors marry together. Eat 'em up!

I believe I first got this recipe years ago from Martha. This is the closest link I could find to the recipe, online.

Friday, June 26, 2009

Oats 'n Honey Granola Pie ~ 6.26.09


Remember I told you I love to collect recipes?


Here's one from the Post-Gazette... in 2004! I believe it won some sort of Pillsbury Pie Crust contest as that is the type of pie crust listed in the ingredients. You could use the refrigerated version or make your own.


I've made this about half a dozen times already and absolutely love it! It's really quick to put together, too. This sweet little pie is similiar to a pecan pie (a lot of the same ingredients). The main difference being that you use crushed up Nature Valley Granola Bars. I know they have a granola cereal out now, so I bet you could use that instead.... I'd rather take out a little aggression and whack at them with a spoon. Feels really good! As I was typing this up, I realized that I've been reading the recipe wrong! I make it with 8 granola bars- 4 pkgs!!!! Ummm, it still works and still tastes really good, so there.


Oats 'n Honey Granola Pie


1 pie crust


Filling:

1/2 cup butter or margarine
1/2 cup packed brown sugar
3/4 cup corn syrup
1/8 tsp salt
1 tsp vanilla
3 eggs, lightly beaten
4 Nature Valley Oats 'n Honey Cruncy Granola Bars (2 pouches from 8.9 oz box), crushed
1/2 cup chopped walnuts
1/4 cup quick-cooking or old-fashioned oats
1/4 cup chocolate chips

Heat oven to 350 degrees. Place pie crust in 9 inch glass pie pan (I've used a 10 inch and aluminum pan and it's been fine).

In lg microwavable bowl, melt butter on high for 50-60 seconds or until melted. Stir in brown sugar and corn syrup until blended. Beat in salt, vanilla, and eggs. Stir in crushed granola bars adn all remaining ingredients into brown sugar mixture, except whipped cream. Pour into pie crust.

Bake at 350 degrees for 40-50 minutes or until filling is set and crust is golden brown, covering crust edge with foil during last 15-20 minutes to prevent excessive browning. Cool at least 30 minutes before serving. Serve warm, room temp. or chilled. Serve with whipped cream or ice c ream. Store in refrigerator.

NOTE: to easily crush granola bars, do not unwrap. Used handle of a spoon or rolling pin to whack 'em to smithereens!


Tuesday, June 16, 2009

Homemade Pita Chips~ 6.16.09

the crickets chirping over here beckoned me back.


sorry for that lapse.


and no, I haven't been all about menu planning either! a little, but not all the way there. some things just take me a wee bit more time!


thought I'd hop on and show you just how easy (and delicious) it is to make your very own pita chips for around 2 bucks plus a few pantry staples.


First you need pita! I buy whole wheat small rounds at our grocery store. They're pretty thin which I like b/c I peel the two sides apart and they make for nice crispy chips!


Here's what else you need: olive oil and kosher salt. You could certainly get adventurous and season these up with whatever you'd like. I'm pretty traditional on the seasoning b/c I like to dip them in hummus or scatter them on my salad like a crouton!


Okay, gather your ingredients...


then peel open your pitas and lay them on a big cookie sheet. Pre heat your oven to 350 degrees.


Brush the pitas with some olive oil then sprinkle them with kosher salt- you don't need much and they don't need to be sopping wet with oil. A light brush and a light sprinkle will do ya!


Next I cut them up with my kitchen shears- oh how I love my kitchen shears! You could also tear them into bite size/dippable size chips.


Scatter them on the pan and pop them in the oven for about 8 minutes.


Find your favorite dip... here are my two favorites:


Make sure you store them in an airtight container. Oh and you can use old, stale pitas for these... makes no difference!

Buon Appetito!

Wednesday, May 20, 2009

Creamy Latin Pasta Salad ~ 5.20.09


This would make a great side dish for your Memorial Day picnic this weekend! It is THE OFFICIAL start of summer and I'm hoping the weather cooperates with the calendar b/c we intend to grill!


Oh how I love a grilled burger or veggies or hot dog or... anything!


I made this when I had the twin's birthday party back in March. We went for a Mexi-themed party and I served Beef and Bean chimichangas, Sweet Potato Burritos, Taco cups (for the kids) and this Creamy Latin Pasta Salad. OH and my favorite Black Bean Salsa made an appearance as well!


So Friday night, 2 days before the party... I was just, you know, looking around on the web for what I was going to make. I already knew the main course, I just needed my sides. AND I went looking to Ingrid Hoffman of Food Network fame.

This recipe doesn't disappoint. It lives up to it's creamy name and gets it's latin flavors from cilantro and lime juice. I add whatever veggies I have around the kitchen. But, the past 2 times I've made it, black and green olives and grap tomatoes have always been present!


Give this a try if you're tired of the same old Italian pasta salad and you'll be glad you did. I just wish my kids liked pasta salad- I think they can't get past the "it's pasta and it's cold" thing. their loss.


Here's what you need and how do make it!

1 lb rotini pasta --- cook to al dente in boiling salted water

Dressing (I double this!- the salad seems to be too dry without adding more dressing)
1/2 cup evaporated milk
1/4 cup extra virgin olive oil
1 cup crumbled feta cheese
1/2 cup fresh cilantro leaves
1 lime juiced
S&P

place all the dressing ingredients in a blender and whirl until smooth and creamy. toss with drained pasta and fold in your add ins....

Add ins:
choppped black olives
chopped green olives
zucchini- I cut into thin slices, stack and then cut into strips
red pepper
red onion (no thank you)
grape tomatoes- cut in half
thin sliced ham
jicama- thinly sliced
1 cup frozen peas

Chill, covered, for at least 2 hours. Mix before serving and taste to see if you need to add a bit more dressing. I did. It seemed dry. As I didn't want to add too much more, I added a drizzle of extra virgin olive oil to loosen it up a bit.

Makes 6-8 servings, at least. I'd say more. I only made this much and had plenty for our large group of 25 + people ('cause not everyone eats it...)!

Monday, May 18, 2009

Bananas Foster French Toast Bake


oh dear.


oh dear, dear, dear.


I was afraid something like this might happen. I neglected blog #2.


Well, that's okay. I have been busy on my little menu planning project. Don't think I forgot about it. I am tweaking and it will take me a bit to do so. Just thought you might like to know.


BUT it is STILL monday and I always have these HIGH hopes that I have these thematic little posts revolving around the days of the week. Who knows if I'll ever stick to that, but in case I do, I'm calling this MAKE THIS MONDAY. As in, you seriously need to make this recipe soon. It's so yummy.

I was inspired by the chica over at Whatever to make her Baked French Toast recipe. I was so inspired that I made it way back on May 1st and have been waiting for another opportunity to make it again.

BUT this time, I put my own little spin on it. I'm getting brave like that lately. Taking a recipe and craftitizing it. ooo. that sounded fancy.

So, I was inspired by the original and came up with my Bananas Foster Baked French Toast.

Smell = heavenly and honestly, it's all you need to smell to get you in the right mind frame for the day...
Taste = sugary and french toasty
Sight = when you see the caramelized sugar glistening in the morning light when you bring this hot breakfast treat over to the table, you'll thank me.


I'm so humble.
Here's how I made this...forgive the non-recipe looking format, I'm typing this from memory...


Preheat oven to 350 degrees. Take a 9x13 pan and put a stick of butter in it and pop it in the oven to melt. I prefer unsalted. You can use whatever you have in the fridge.


Measure out a cup of brown sugar and 2 tsp. of ground cinnamon.


Slice up 3-4 bananas- depending on the size of the banana and your need to get rid of some over-ripe nanas (but never toss them! throw them in the freezer till you have some time to make banana bread or mexican monkey cake).


Okay, now that the butter is melted, throw in the brown sugar and the cinnamon. Shmush it all around and mix it all up and then even it out on the bottom of the dish. Now scatter your bananas on top of the sugar mixture. Here's where you can take this to the bananas foster level and add a few dashes (like 1 tsp) of rum extract or dark rum! I went without this option as I thought of it after this concoction came out of the oven. I couldn't wait till I tweaked all the ingredients before I shared it with you... so maybe I'll revise at a later date!


Take one loaf of bread- I used
a cinnamon loaf and it was great! I sliced mine thinly as you'll want to shoot for 3 layers of the bread. Lay the bread slices on top of the banana/sugar mixture- turning the bread to get a good even layering without too many holes. You can tear up a few slices to fill in the holes, too.

Now for the custard:

6 eggs
2 cups of milk
1-2 tsp vanilla
dash of salt

whisk that all together and slowly pour it over your bread. You want it to soak in and get into all the nooks and crannies.


Pop it all in the oven at 350 for 30-35 minutes. You want to make sure the custard is cooked and not goopy.


As an optional step (and this was part of the original recipe, but you can take it or leave it)- drizzle maple syrup (the real stuff) over the top of the french toast after it's baked and broil it for a few minutes. Until bubbly. Watch out though it happens FAST!


I got about 12 servings out of this-or 6 BIG servings. Perfect with fresh fruit over the top!

Monday, April 27, 2009

Take the plunge & have a slice of breakfast pizza ~ 4.27.09


I've been inspired.

I've been thinking about taking the plunge lately and well, I'm just going to dive in.

I'm sick of it being 4:30 and me wondering, what exactly can I throw together for these 4 kids and myself? (I usually know what's for dinner on the nights when Mr. Crafty is going to be home) I'm tired of running to the grocery store with 2-4 kids (depending on the day and time) b/c I don't have cilantro or milk or food.


Leila is inspiring me to get those meals thought out, planned and money will be saved!

Let's here it for knowing what's for dinner before dinner! WOO HOO!

Let's here it for saving money! WOO HOO!!!

Let's here it for taking the time to finally plan it all out! WOO HOO!!!!!!!!!!

If there's anything that having a blog (or two) has taught me, it is this- if I put it "out there" in the world that I'm going to do something, I will do it. I have accountability. I have friends and Mr. Crafty P asking me, "have you done _____ yet?" It's a remarkable system and it's working. And I'm trusting in this practice that it will work with this as well.

So, it began when I found Leila's posts on her sidebar. You can start HERE and then check out her sidebar for worksheets and more posts to inspire YOU!

Who wants to join me? I love a party and this seems like a good party to get into on a weekly basis, no?

Wondering what the picture up above is? Those are the infamous Bananaroni Pizzas. I saw a picture of them in a parenting magazine, I believe it was a freezer waffle ad and thought - awesome idea!

Make your frozen waffles. Spread with butter, then your favorite jam/jelly. Top with sliced bananas, maybe sprinkle on some wheat germ (ooo! good idea! just thought of that!) and cut with a pizza slicer.

A fun way to mix up eating waffles the same way all the time!

p.s. I've begun this process in varying stages for awhile now, but I'm ready to embrace it fully! Let's GO!

Friday, April 24, 2009

Sweet Potato Burritos! Ole~ 4.24.09

Now with PICTURES!
I've had this recipe dog-eared to try for a LONG time, but I could never justify making it b/c I figured I would be the only one eating it. It does sound like a strange combination, but trust me, it is so darn good! I've made them twice now since the first attempt and may try sticking to the recipe a bit more. I would say I'm often "inspired" more by recipes lately, than I am at making them verbatim. Nothing wrong with that, it helps me be more creative in the kitchen!

I made these along with another recipe from the same cookbook for Z & D's second birthday a few weeks back. A good crowd pleaser and 5 thumbs up from me! It does help if you like sweet potatoes b/c they are the star ingredient!

Addictive Sweet Potato Burritos
inspired by Allrecipes dinner tonight cookbook, pg. 163

1 can refried black beans
2 large sweet potatoes (or more depending on who you're feeding)
8 oz shredded monterey jack cheese
10-12 burrito size tortillas- the whole wheat ones were great for this!

1. Roast your sweet pototoes until they start to ooze, split open and are easily pierced with a knife. Peel and mash up those potatoes until nice and smooth. Get a baking sheet ready with foil and a little cooking spray on it. (NOTE: since this step takes a good hour +, I often do it ahead of time, say, the night before when I'm making dinner. I just throw the taters in while I'm cooking something else!)

2. Get your ingredients ready assembly line style: refried beans and spreader, mashed sweets, shredded cheese, tortillas.

3. Heat up a couple tortillas in the microwave to help make them soft and malleable- spread on a little refried beans- keep them away from the edges. I usually spread enough to make an oval shape in the middle of my tortilla- remember you're rolling them up and you don't want them to ooze out on the baking sheet. Then spoon a couple tablespoons of sweet potatoes. Lastly, sprinkle on some monterey jack cheese.


4. Roll 'em up and line 'em up on your baking sheet. Keep going until you have enough or you're out of ingredients.

5. Bake at 375 until hot- about 12-15 minutes. I rub a little olive oil on top of the tortillas to crisp them up and b/c it tastes good!

Serve with chips and salsa or my favorite Black Bean Salsa!

But today, I had mine with Our Best Bites Lime Cilantro Rice with Pineapple... c'mon, you know this is good stuff!


I think I'll start adding who in the house likes the recipe I write up, so that I can have a good reference when I'm searching for something to make.

Mr. Crafty hasn't tried these yet... somehow, they're always gone before he gets to them.
G gobbled them up with me.
The other three are a mixed bag- depends on the day, the hour, the moon's phase and the weather.

I'll also try and get some pics up a bit later so you can see the finished product...

Wednesday, April 22, 2009

How to make a s'meep ~ 4.22.09

To celebrate this great and wonderful 2nd Wednesday of Easter, I thought I'd introduce you to our new favorite seasonal treat, the s'meep.

hello soon-to-be-s'meep!
simply a graham cracker, some chocolate bar on top of that and the peep or bunny of your choice on top of that!

into the oven you go... hot and melty s'meeps!


and ready to be eaten while we cheer on the PENS!

delicious little s'meeps!

Thursday, April 16, 2009

Thai Peanut Noodles with a TIP~ 4.16.09

It looks like the Thai Peanut Noodles have won that little contest over there. So, here goes.


I found these via Our Best Bites (which you'll see a link to on my sidebar). Great recipes over there by 2 lovely ladies. I have my eye on several and you will certainly find one, two or a dozen that you'd like to try, so check them out!


A few weeks back we celebrated my cousin Karen's 50th birthday while her daughter, Brooke, and grandson, Shane, were in town. Brooke's a faithful reader over here and at She's a Crafty Pumpkin and my second cousin!


there's mom getting the cake ready and see in the bottom corner, those are the noodles!


Anywho, we decided to throw Karen a Asian Fusion party. Fusion b/c we had an eclectic mix of foods and it just sounds so sassy to say "Asian Fusion", don't you think?

We made a delicious Asian Chicken Salad, Thai Peanut Noodles, heated up some pre-made egg rolls and had a couple dips thrown in for good measure. The highlights were the chocolate fountain and the Italian Creme Cake. Mmmmm.... delicious.

However, I thought these thai peanut noodles were especially lip delish. I made them up earlier in the day and absolutely
could
n o t
S T O P
eating them! I've made them twice now and lowered the heat a good bit for the kids. They didn't get into them as much as their mum, but whatever, I love these noodles and will make them from time to time as they are simple, simple!


Here's what you need:

1/2 cup chicken broth
3 Tbsp. creamy peanut butter
**1-2 tsp Sriracha chili sauce (1 is mild w/ a bite, 1 1/2 is medium and 2 is HOT)
1 1/2 Tbsp honey
3 Tbsp. soy sauce
1 1/2 Tbsp. minced fresh ginger
2-3 cloves garlic, minced
8 oz of linguine or Udon noodles (I used linguine)
chopped green onions
chopped cilantro
2 limes, cut into quarters
chopped peanuts

Bring a large pot of water to a boil and then salt it. Add your noodles. Remember the recipe calls for 8 oz, so if you make a whole package, be sure to double your sauce!!

In a medium saucepan, combine the PB, chili sauce, chicken broth, honey, soy sauce, ginger and garlic over medium-low heat. Whisk together until smooth and warmed through. Taste as to adjust the heat level to your liking.

Once the noodles are done cooking, drain and put them back in the pot. Add the Peanut sauce and combine.

Serve it up in bowls and let everyone add their own toppings: green onions, cilantro, lime and peanuts! I like it all and the lime juice really makes these noodles sing!

**NOTE about the Sriracha chili sauce- it's HOT and I am a complete wus when it comes to spicy foods, but this is an essential ingredient and I love the background heat that it added to the noodles. I found it to be cheapest at Wal-mart and almost a dollar more at my grocery store!

Now here's a great tip for chopping up herbs, like the cilantro in this recipe. I love this trick b/c the herbs don't fly off your cutting board and it's seriously QUICK!

Get a small cup and toss in some herbs. Here I have flat leaf parsley that I've cut off from a big bunch of parsley.


Grab your kitchen shears. If you do not own these, please go put on a pair of shoes and grab your keys and get yourself a nice pair. I could not survive in the kitchen without them. They are indispensable!

For those of you who have them, let's continue, the others will catch up later...Put your shears in the cup and start cutting up those herbs!


Voila! Perfectly cut up herbs and no mess but a cup.

Coming up next post...
Addictive Sweet Potato Burritos- oh my!